
By Erin Bennett
Test Data Lead | Hautū Raraunga Whakamātautau
Unfortunately, it’s not always clear how to adjust your oven's clock, or what the symbols on the controls mean.

Most ovens with a timer function have minute + and – buttons or a dial, which are also used to set the clock. Awkwardly, you may also need to hold down another button, which may not be the most logical such as “menu” or “cook” . Otherwise, you might end up setting an unwelcome 3am cooking timer.
Here are directions for how to change the time on ovens from several major brands (note: these instructions may not apply to all models).
Need more help?
Check your oven’s manual for instructions. If you’ve lost it, you can usually find a digital copy online. Go to the manufacturer’s website and search for your model number (even if it’s no longer available for sale).
AEG
Digital controls (buttons)
Press the “power” button and – then using the up and down buttons select the “menu” option, press “OK” to confirm. Use the up and down keys to go to “Basic settings”, then select “Set Time of Day”. Use the up and down buttons to select the time and confirm by pressing “OK”.

Bosch
Analogue controls (dial and buttons)
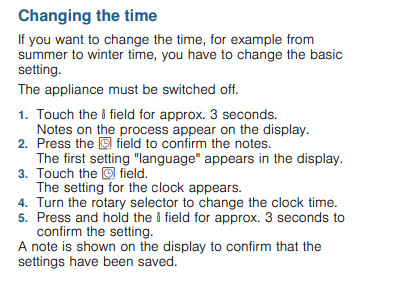
Press and hold the i button for 3 seconds. Select the clock field twice and then use the rotary selector to adjust the time. Press and hold the i field for 3 seconds to confirm the time.
Digital controls (buttons)
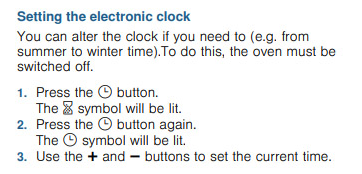
Turn the oven off. Press and hold the “clock” button until the symbol for the time is underlined, then use the + or - buttons to change the time. Confirm by pressing the “clock” button.

OR
Press the “clock” button, then a timer symbol should appear. Press the “clock” button again and the clock symbol will be lit. Use the + and – buttons to adjust the time.
Fisher & Paykel
Analogue controls (dial and buttons)
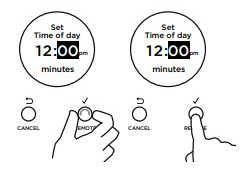
Use the knob to scroll to your desired clock display. If you select analogue 12-hour you then need to choose between am and pm, using the Select/Scroll knob, and press the knob to confirm. Next twist the Select/Scroll knob to set the time, pressing it to confirm.
Note: Some Fisher & Paykel ovens allow you to choose between a digital and analogue display for the clock.
Digital controls (buttons)
Hold the “cook” button down. Then press the up and down arrows to adjust the time.

Note: Some Fisher & Paykel ovens allow you to choose between a digital and analogue time display.
Haier
Digital controls (buttons)
Hold the “cook” button down. Then press the up and down arrows to adjust the time.

Note: Some Fisher & Paykel ovens allow you to choose between a digital and analogue time display.
Samsung
Analogue controls (dial and buttons)
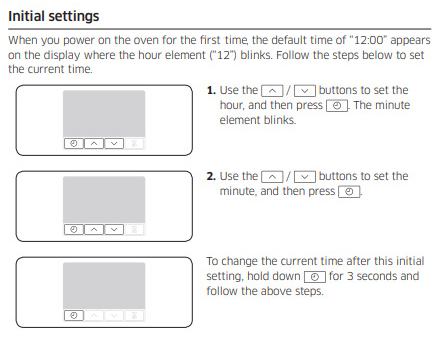
Press and hold the “clock” button for 3 seconds until the hour blinks, turn the right-hand dial to set the hour. Then press the “clock” button to adjust the minutes. When done, press the “clock” button to set the time.
Westinghouse
Digital controls (buttons)
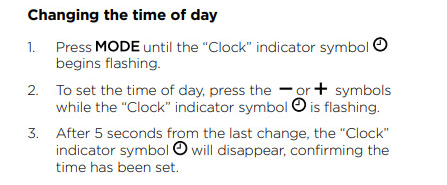
Press “mode” until the clock icon flashes. Then press the + and – buttons to adjust the time. The time will be confirmed 5 seconds after the final button is pressed, and the clock icon will disappear.
Miele
Analogue controls (dial and buttons)
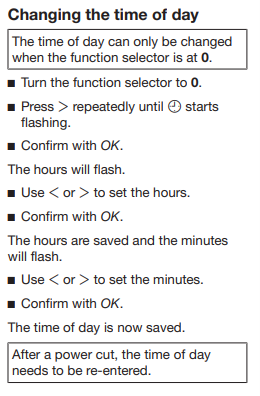
Turn the Function selector dial to 0 and press the > button until the clock symbol starts flashing and confirm by pressing the OK button. The hours should be flashing, adjust the time by pressing the < and > buttons, click OK to confirm. The minutes should be flashing, adjust the time by
pressing the < and > buttons, click OK to confirm.
Stay in the know
Keep up-to-date with Consumer's latest news, investigations and product and service reviews, plus join the Consumer panel with invitations to take part in surveys.